

Deliciously Refreshing Chocolate-Dipped Kiwi Pops: A Sweet Treat for Any Occasion
Introduction
Chocolate-dipped fruits have long been celebrated as a delightful treat, combining the natural sweetness of fruit with the rich, decadent flavor of chocolate. This classic pairing not only satisfies your sweet tooth but also offers a variety of textures and tastes that make each bite an adventure. Among the numerous fruits that can be dipped in chocolate, kiwi stands out as a unique choice, thanks to its vibrant green color, juicy flesh, and tangy flavor. The combination of the slightly tart kiwi with the smooth, sweet chocolate creates a harmony that tantalizes the taste buds and leaves you craving more.
Kiwis are not just a pretty fruit; they pack a nutritional punch as well. Rich in vitamins C and E, fiber, and antioxidants, kiwis support a healthy immune system and promote good digestion. When transformed into Chocolate-Dipped Kiwi Pops, this healthy fruit becomes a guilt-free indulgence that can be enjoyed by both kids and adults alike. Whether you’re looking for a refreshing summer dessert, a fun party treat, or a simple snack, these kiwi pops are perfect for any occasion.
Understanding the Ingredients
Before diving into the recipe, it’s essential to understand the key ingredients and their roles in creating these delicious Chocolate-Dipped Kiwi Pops.
1. Ripe Kiwis: The star of our recipe, kiwis are not only flavorful but also incredibly nutritious. When selecting kiwis, look for fruits that yield slightly to gentle pressure, indicating ripeness. A ripe kiwi will have a sweet, aromatic scent and a vibrant green color with tiny black seeds. Their tangy flavor pairs beautifully with chocolate, creating a complex taste that is both refreshing and indulgent.
2. Dark Chocolate Chips vs. Milk Chocolate Chips: The choice of chocolate can significantly influence the taste of your kiwi pops. Dark chocolate chips provide a rich, slightly bitter flavor that complements the sweetness of the kiwi, while milk chocolate chips offer a creamier, sweeter alternative. If you prefer a balance of flavors, consider using semi-sweet chocolate chips. Each type of chocolate contributes its unique characteristics, so choose according to your personal taste preference.
3. Coconut Oil: Adding coconut oil to your chocolate not only helps achieve a smooth, glossy finish but also aids in the melting process. The oil reduces the viscosity of the chocolate, making it easier to dip the kiwis. Moreover, coconut oil has its own health benefits, including medium-chain triglycerides that may support metabolism and provide a quick energy source.
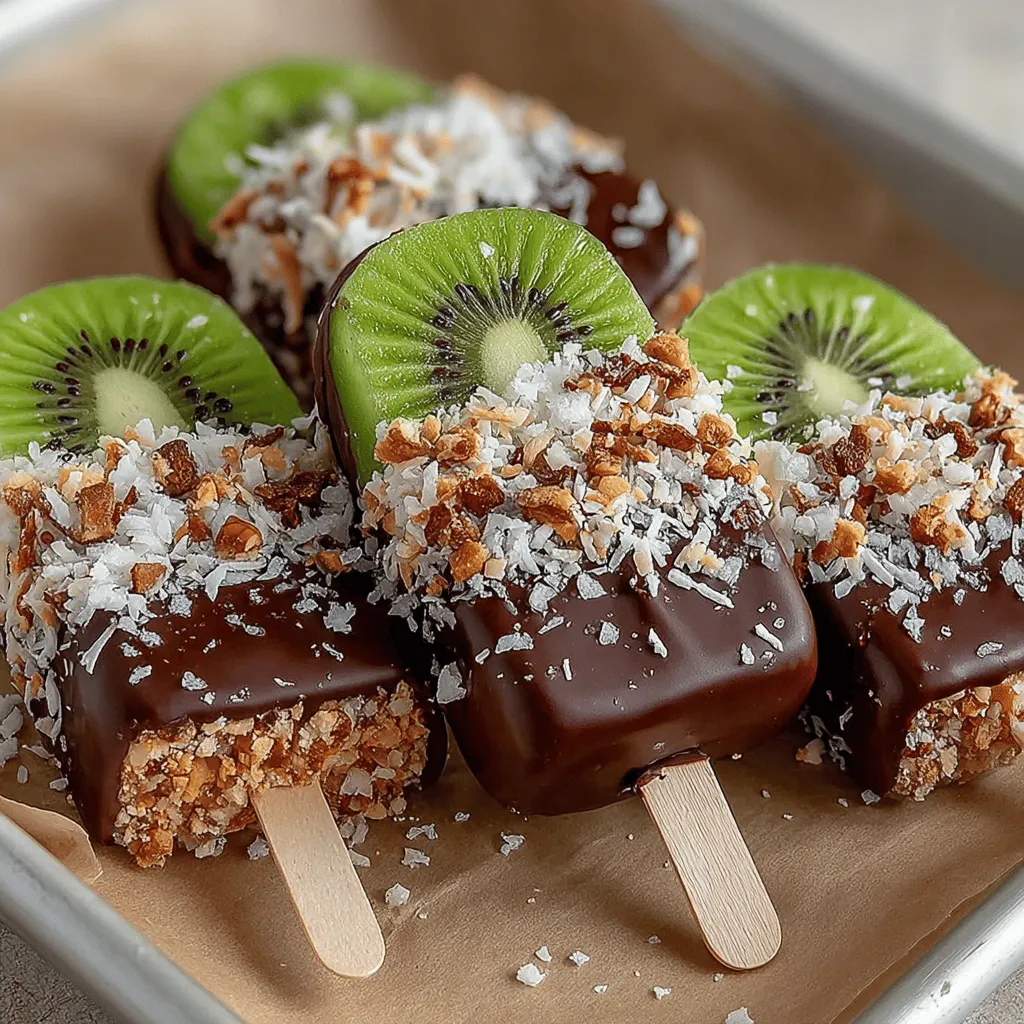
4. Nuts and Shredded Coconut: For those looking to enhance the texture and flavor of their Chocolate-Dipped Kiwi Pops, nuts and shredded coconut are excellent topping options. Chopped almonds, walnuts, or pistachios add a satisfying crunch and extra nutritional benefits, including healthy fats and protein. Shredded coconut, on the other hand, imparts a tropical flair and additional sweetness, making your pops even more delightful.
5. Sea Salt Flakes: A sprinkle of sea salt flakes elevates the flavor profile of the chocolate, creating a delightful contrast that enhances the overall experience. The salt balances the sweetness and amplifies the richness of the chocolate, making each bite even more enjoyable.
Step-by-Step Instructions
Now that we’ve covered the ingredients, it’s time to get into the heart of the recipe with a detailed breakdown of each step involved in making Chocolate-Dipped Kiwi Pops.
Preparing the Kiwis: Begin by selecting ripe kiwis and washing them thoroughly to remove any dirt or residue. To peel the kiwis, use a sharp knife to cut off both ends, making it easier to grip. Then, carefully slice off the skin, following the curve of the fruit to minimize waste. Once peeled, slice the kiwis into rounds or wedges, depending on your preference. Aim for uniform sizes—about half an inch thick is ideal—to ensure even chocolate coating and presentation.
Melting the Chocolate: To melt the chocolate for your kiwi pops, you have a couple of effective methods to choose from. The most common method is the microwave. Place your chocolate chips in a microwave-safe bowl, adding a teaspoon of coconut oil. Heat in 30-second intervals, stirring in between, until the chocolate is smooth and fully melted. Be cautious not to overheat, as chocolate can burn quickly. Alternatively, if you prefer a more controlled melting process, use a double boiler. Fill a pot with water and bring it to a simmer. Place a heatproof bowl on top, ensuring it doesn’t touch the water, and add your chocolate chips and coconut oil. Stir continuously until melted and silky.
Dipping the Kiwis: Once your chocolate is ready, it’s time to dip the kiwi slices. Grab your prepared kiwi slices and hold each piece by the edge to avoid messy fingers. Dip one side of the kiwi into the melted chocolate, allowing any excess to drip back into the bowl. To achieve a perfect coating, consider using a fork or a skewer to help maneuver the kiwi in the chocolate. Place the dipped kiwis on a parchment-lined baking sheet, ensuring they are spaced apart to prevent sticking.
Adding Toppings: This is where the fun begins! While the chocolate is still wet, you can sprinkle your choice of toppings over the chocolate-dipped kiwis. For a crunchy texture, add chopped nuts or shredded coconut. If you’re feeling adventurous, consider experimenting with crushed freeze-dried fruits, sprinkles, or even a drizzle of white chocolate for added flair. The possibilities are endless, allowing you to customize each pop to your liking.
With these initial steps completed, you’re on your way to creating a batch of irresistible Chocolate-Dipped Kiwi Pops that are sure to impress. The vibrant colors and textures of the kiwis paired with the rich chocolate create a visually stunning and delicious treat that everyone will love. Stay tuned for the next part of the recipe, where we’ll discuss cooling and storage options, as well as some creative serving suggestions!
Freezing the Pops
Once you’ve dipped your kiwi slices in rich dark chocolate, the next crucial step is freezing them. Freezing the pops not only solidifies the chocolate coating but also enhances the texture and flavors. Aim for a freezing time of at least 2 hours, but for the best results, consider leaving them in the freezer for up to 4 hours. This allows the chocolate to set firmly, resulting in a satisfying crunch when bitten into. Additionally, a longer freezing time can help the kiwi’s natural sweetness intensify, creating a harmonious blend of flavors when combined with the chocolate.
To freeze the pops effectively, lay the chocolate-dipped kiwis on a baking sheet lined with parchment paper, ensuring they are spaced apart to prevent sticking. Once frozen, transfer them to an airtight container or a resealable freezer bag. This will help maintain their quality and prevent any freezer burn.
Serving Suggestions
When it comes to serving your chocolate-dipped kiwi pops, presentation is key, especially if you’re showcasing them at a party or gathering. Here are some creative ideas to make your treats shine:
1. Fruit Platters: Arrange the pops on a vibrant fruit platter alongside other colorful fruits like strawberries, blueberries, and melon. This not only enhances the visual appeal but also offers guests a variety of healthy options.
2. Stand-up Display: Insert pops into a block of floral foam or a decorative Styrofoam base covered with decorative paper. This creates a visually striking display, perfect for parties or events.
3. Individual Wrapping: For a more personal touch, wrap each pop in cellophane and tie with a ribbon. This makes for an excellent party favor or a delightful treat for kids’ lunchboxes.
4. Chocolate Sauce Drizzle: For added flair, drizzle some melted chocolate over the pops just before serving for a gourmet look. You could also sprinkle some crushed nuts or shredded coconut on top for added texture and flavor.
Optional Garnishes
Garnishes can elevate your chocolate-dipped kiwi pops, both aesthetically and in flavor. One delightful option is to sprinkle a pinch of flaky sea salt over the chocolate coating just before it sets. The combination of the sweet chocolate and the savory salt creates an irresistible flavor contrast that takes these treats to the next level. Not only does it enhance the taste, but it also adds a beautiful finishing touch, making your pops look more gourmet.
You might also consider adding crushed nuts, such as pistachios or almonds, for a crunchy texture, or a sprinkle of coconut flakes for a tropical twist. These garnishes can easily be customized based on personal preference or dietary needs.
The Health Benefits of Kiwi
Kiwis are not only delicious but also packed with nutrients, making them an excellent choice for a healthy dessert. Here’s a quick look at the nutritional profile of kiwis:
– Vitamins and Minerals: Kiwis are an excellent source of Vitamin C, Vitamin K, and Vitamin E. They also provide potassium and magnesium, which are essential for heart health and maintaining proper bodily functions.
– Antioxidants: Kiwis contain various antioxidants that help combat oxidative stress in the body, promoting overall health and wellness.
– Dietary Fiber: The fiber content in kiwis aids in digestion and helps maintain a healthy gut, making them a great addition to any diet.
Incorporating kiwis into a balanced diet can contribute to overall health, providing essential nutrients while satisfying your sweet tooth.
Benefits of Dark Chocolate
Pairing kiwi with dark chocolate not only satisfies cravings but also offers health benefits when consumed in moderation. Dark chocolate is rich in antioxidants, particularly flavonoids, which are known to support heart health and improve blood circulation. Additionally, it may help reduce inflammation and lower blood pressure.
Opting for dark chocolate with at least 70% cocoa content ensures you’re reaping the most benefits. This chocolate is lower in sugar compared to its milk chocolate counterpart and contains more health-promoting compounds.
Why Chocolate-Dipped Kiwi Pops Make an Ideal Treat
Versatility
Chocolate-dipped kiwi pops are incredibly versatile, making them suitable for various occasions. Whether you’re hosting a summer gathering, providing healthy snacks for kids, or looking for a refreshing dessert to serve at a party, these pops are a fantastic choice. Their vibrant colors and delicious flavors appeal to both kids and adults, ensuring they will be a hit on any dessert table.
Customizability
Another great aspect of chocolate-dipped kiwi pops is their customizability. Feel free to personalize the recipe according to your taste preferences. You can experiment with different types of chocolate, such as milk or white chocolate, or even try flavored chocolate for a twist.
Moreover, the toppings can range from crushed nuts and colorful sprinkles to dried fruit or granola. This flexibility allows you to create a unique treat each time, ensuring that you and your family never get bored.
Kid-Friendly
Encouraging healthy eating habits in children can sometimes be a challenge, but these chocolate-dipped kiwi pops make it fun! The combination of fruit and chocolate creates a treat that feels indulgent while still being nutritious. Kids will love the bright colors and fun shape, making them more likely to enjoy a healthy snack without resistance.
Storage and Shelf Life
To maintain the freshness and quality of your chocolate-dipped kiwi pops, proper storage is essential. After your pops are fully frozen, transfer them to an airtight container or a resealable freezer bag. This not only prevents freezer burn but also helps keep the pops tasting fresh for longer.
In general, chocolate-dipped kiwi pops can be stored in the freezer for up to 2 months without losing their quality. However, for the best taste and texture, it’s recommended to enjoy them within the first month. When you’re ready to enjoy a pop, simply take them out of the freezer and let them sit at room temperature for a few minutes to soften slightly before indulging.
Conclusion
In conclusion, chocolate-dipped kiwi pops are a delightful and healthy treat that anyone can enjoy. With their simple preparation and the ability to customize flavors and toppings, these pops are perfect for any occasion. Whether you’re serving them at a summer barbeque, a children’s party, or as a quick snack, they are sure to impress.
Don’t hesitate to experiment with the recipe, adding your own twist or personal variations to make these treats truly your own. The process of creating these chocolate-dipped kiwi pops can be a fun activity to share with family and friends, encouraging creativity in the kitchen.
Enjoy the sweet yet guilt-free satisfaction these chocolate-dipped kiwi pops provide, knowing you’re indulging in a treat that is as nutritious as it is delicious! So grab your ingredients and start creating these delightful pops today; your taste buds will thank you!
