

Irresistible No-Bake Chocolate Cookie Dough Balls
Introduction
In recent years, no-bake desserts have surged in popularity, captivating the hearts of dessert lovers and health-conscious eaters alike. These delightful treats offer a solution for those craving something sweet without the long baking times and complex preparations typically associated with traditional desserts. One such recipe that has gained a loyal following is the No-Bake Chocolate Cookie Dough Balls. These bite-sized indulgences perfectly blend rich chocolate flavor with the satisfying texture of cookie dough, making them an irresistible option for anyone looking to satisfy their sweet tooth.
What sets these No-Bake Chocolate Cookie Dough Balls apart is their adaptability. Whether you’re hosting a party, preparing a snack for the kids, or simply treating yourself after a long day, this recipe is incredibly versatile. The ease of preparation means you can whip them up in no time, and with a few simple ingredients, you can create a delicious treat that caters to a variety of dietary preferences. Both indulgent and health-conscious eaters will find something to love in these delightful bites.
The Appeal of No-Bake Desserts
The allure of no-bake desserts lies not only in their simplicity but also in their practicality. With minimal kitchen equipment required and no need for an oven, these recipes are perfect for anyone, from novice bakers to seasoned chefs. For busy lifestyles, the time-saving aspect of no-bake treats is particularly appealing. You can mix the ingredients in a single bowl, roll them into balls, and they’re ready to enjoy, often with no chilling time required.
Moreover, the ingredients used in No-Bake Chocolate Cookie Dough Balls are often healthier alternatives to traditional dessert components. Almond flour, for instance, provides a gluten-free base that is rich in nutrients while nut butter offers a creamy texture and healthy fats. When combined with natural sweeteners like maple syrup or honey, these treats can satisfy your cravings without the guilt typically associated with sugary indulgences. The satisfaction derived from enjoying a sweet treat that is both wholesome and delicious is one of the key reasons no-bake desserts are becoming a staple in many households.
Ingredients Breakdown
To create these No-Bake Chocolate Cookie Dough Balls, you’ll need a selection of simple yet nutritious ingredients. Let’s delve into each component to understand their roles and benefits.
– Almond Flour: This gluten-free flour serves as the primary base for the cookie dough balls. Packed with protein, fiber, and healthy fats, almond flour not only provides a delicious nutty flavor but also enhances the nutritional profile of the dessert. Its fine texture allows for a smooth, cookie dough-like consistency, making it an excellent alternative to traditional wheat flour.
– Nut Butter: Nut butter is a versatile ingredient that adds creaminess and rich flavor to the dough. Options like almond butter, peanut butter, or cashew butter can be used, each bringing its unique taste and nutritional benefits. Nut butters are generally high in protein and healthy fats, contributing to a feeling of fullness and satisfaction.
– Maple Syrup or Honey: These natural sweeteners are the perfect way to add sweetness without resorting to refined sugars. Maple syrup offers a distinct flavor that pairs beautifully with chocolate, while honey brings a floral note. Both options provide a healthier alternative, with the added benefit of being less processed than conventional sweeteners.
– Vanilla Extract: A splash of pure vanilla extract enhances the overall flavor profile of the cookie dough balls. It adds warmth and complexity, ensuring that the treat is rich and satisfying.
– Salt: A pinch of salt is essential for balancing the sweetness of the other ingredients. It enhances flavor and ensures that the cookie dough balls are not overly sweet, providing a more rounded taste.
– Mini Chocolate Chips: No cookie dough is complete without chocolate chips. Opting for high-quality dark chocolate chips will elevate the flavor and add a touch of indulgence to each bite. They provide a delightful contrast to the creamy dough and make these balls even more irresistible.
– Rolled Oats: While optional, adding rolled oats can introduce a chewy texture and additional nutrition. Oats are a great source of fiber and can help make the cookie dough balls more filling.
– Additional Melted Chocolate: For those wanting to take their treat to the next level, a drizzle of melted chocolate over the finished cookie dough balls adds a beautiful finish and an extra layer of chocolatey goodness.
Step-by-Step Instructions
Now that we’ve covered the enticing ingredients, let’s transition into the preparation process. Making these No-Bake Chocolate Cookie Dough Balls is straightforward, and the first step is mixing the dry ingredients.
1. Mixing Dry Ingredients: In a large mixing bowl, start by combining the almond flour, a pinch of salt, and any optional ingredients like rolled oats. Whisk these together to ensure they are evenly distributed. Proper mixing at this stage is crucial, as it helps the flavors meld together and ensures a consistent texture throughout the dough.
Once your dry ingredients are well combined, you can move on to adding the wet ingredients for a perfectly balanced cookie dough. Remember, the key to achieving that irresistible taste and texture lies in the mixing technique and the quality of your ingredients. By giving careful attention to each step, you set the foundation for a delightful treat that is sure to impress.
Stay tuned for the next part of this article, where we’ll dive deeper into the mixing process and the remaining steps to create these No-Bake Chocolate Cookie Dough Balls, ensuring you achieve the best results possible.
Combining Wet Ingredients
Start by preparing the wet ingredients, which are crucial for achieving the rich and indulgent flavor profile of your no-bake chocolate cookie dough balls. In a large mixing bowl, combine 1/2 cup of creamy peanut butter (or your preferred nut butter), 1/4 cup of maple syrup or agave nectar, and 1 teaspoon of vanilla extract. Stir these ingredients together until they are well blended and smooth. The peanut butter not only adds flavor but also acts as the binding agent, giving the cookie dough a delightful texture.
Tips for Achieving a Smooth Consistency
To ensure a perfectly smooth mixture, consider the following tips:
– Room Temperature Ingredients: Make sure your peanut butter is at room temperature. This will make it easier to mix and will help achieve a smoother consistency.
– Use a Whisk or Electric Mixer: A whisk can effectively combine the ingredients, but for an extra smooth mixture, an electric mixer can speed up the process and reduce any lumps.
– Sift the Sweetener: If using powdered sugar or any powdered sweetener, sifting it before adding to the wet mixture can help avoid clumps.
Merging Wet and Dry Mixtures
Once your wet mixture is smooth, it’s time to combine it with the dry ingredients. In a separate bowl, whisk together 1 cup of rolled oats, 1/2 cup of almond flour (or any preferred flour), and 1/4 cup of cocoa powder. This combination will not only provide texture but also a rich chocolate flavor. Gradually add the dry mixture to the wet ingredients, stirring continuously with a spatula or wooden spoon.
Adjusting Consistency Based on the Texture of the Dough
As you mix, you may find that the dough is too dry or too wet. If it feels crumbly, add a tablespoon of almond milk or any non-dairy milk to help bind it together. Conversely, if the mixture is too sticky, add a little more almond flour until you reach the desired consistency. Aim for a dough that holds together well but is not overly sticky. This balance is key for shaping the cookie dough balls later.
Folding in Chocolate Chips
Once your dough has reached the perfect consistency, it’s time to fold in the chocolate chips. Use 1/2 cup of semi-sweet chocolate chips or dark chocolate chips for a richer flavor.
Techniques for Even Distribution Without Breaking Chips
To ensure even distribution of the chocolate chips without breaking them, follow these steps:
– Gentle Folding: Use a spatula to gently fold the chocolate chips into the dough. Avoid vigorous stirring, which can break the chips and create a mess.
– Even Spreading: If you notice any clumps of chocolate chips, gently separate them with your fingers before folding them in. This way, each cookie dough ball will be evenly dotted with chocolate.
Forming the Balls
The next step is to shape your dough into balls. Using a cookie scoop or your hands, take about 1 tablespoon of dough and roll it into a ball.
Best Practices for Shaping Perfect Cookie Dough Balls
– Uniform Size: To ensure even cooking and presentation, aim for uniform-sized balls. A cookie scoop is particularly helpful for this.
– Moisten Your Hands: If the dough sticks to your hands, lightly moisten them with water or non-stick cooking spray to make rolling easier.
– Avoid Overworking the Dough: Handle the dough as little as possible to maintain its texture and prevent it from becoming too warm.
Chilling the Dough
After forming the balls, place them on a parchment-lined baking sheet. Chilling the dough is an essential step that enhances both texture and flavor.
Explanation of How Chilling Improves Texture and Flavor
Chilling allows the fats in the nut butter to solidify, which helps the cookie dough balls maintain their shape. Additionally, resting the dough enhances the flavors as the ingredients meld together more thoroughly. For best results, chill the cookie dough balls in the refrigerator for at least 30 minutes.
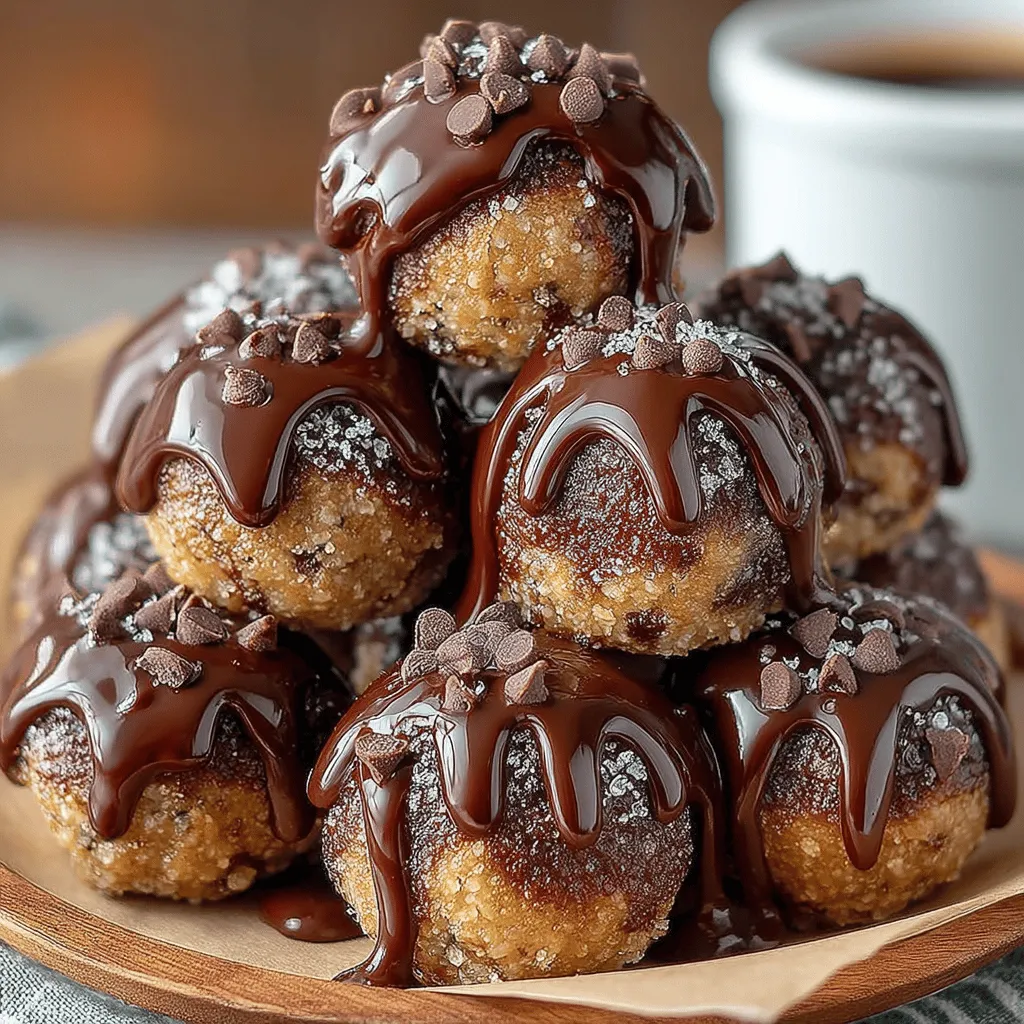
Adding the Optional Drizzle
For an extra touch of decadence, consider adding a chocolate drizzle. Melt 1/4 cup of chocolate chips in a microwave-safe bowl in 20-second intervals, stirring between each interval until smooth.
Tips on Melting Chocolate and Drizzling Techniques
– Use a Double Boiler: If you prefer, you can melt the chocolate using a double boiler to prevent scorching.
– Drizzling: Once melted, transfer the chocolate to a small zip-top bag, cut a tiny corner off, and drizzle it over the chilled cookie dough balls for a professional finish.
Serving Suggestions and Storage
These no-bake chocolate cookie dough balls are versatile and can be served in various ways:
– Perfect for Parties: Serve them on a dessert platter at gatherings, parties, or celebrations for a sweet treat that everyone will love.
– Pair with Beverages: These cookie dough balls pair beautifully with coffee, tea, or a glass of almond milk for a delightful snack.
Discussion on How to Store Leftovers Effectively
To keep your cookie dough balls fresh, store them in an airtight container in the refrigerator. They will stay fresh for up to one week. For longer storage, consider freezing them. Place the balls in a single layer on a baking sheet and freeze until solid, then transfer to a freezer-safe container. They can last for up to three months in the freezer.
Nutritional Information
These no-bake chocolate cookie dough balls are not only delicious but also nutritious. Here’s a breakdown of the nutritional information per cookie dough ball (assuming the recipe yields about 12 balls):
– Calories: Approximately 100
– Protein: 3g
– Fats: 5g
– Carbohydrates: 12g
Discussion on Dietary Considerations
This recipe can easily be adapted for various dietary needs:
– Vegan: The ingredients are naturally vegan; just ensure your chocolate chips are dairy-free.
– Gluten-Free: Using gluten-free oats and flour makes this recipe entirely gluten-free.
Conclusion
These irresistible no-bake chocolate cookie dough balls are not only simple to make but also an indulgent treat that satisfies your sweet tooth without the guilt. With their rich chocolate flavor and smooth texture, they are perfect for any occasion, whether you’re hosting a party or just want a quick snack.
Don’t hesitate to try this recipe and make it your own by experimenting with different mix-ins and flavors. Whether you prefer a nutty twist or an extra chocolatey version, the possibilities are endless. Enjoy these delightful cookie dough balls knowing you’re treating yourself to something that is both delicious and health-conscious!