
Introduction
In the realm of wholesome snacks, few treats can rival the delightful combination of pumpkin and banana. These Yummy Pumpkin Banana Snack Bars are not only delicious but also packed with nutrients, making them a perfect choice for a quick breakfast or a satisfying afternoon snack. With the rise of health-conscious eating, snacks like these have gained popularity, combining flavor and nutrition in a way that appeals to both adults and children alike. This article will explore the health benefits of the key ingredients, guide you through the step-by-step preparation process, and offer insights into how to customize this recipe for your taste.
Understanding the Key Ingredients
The Nutritional Power of Bananas
Bananas are one of the most popular fruits in the world, and for good reason. They are rich in essential nutrients such as potassium, vitamin C, and vitamin B6. One of the standout benefits of ripe bananas is their high fiber content, which helps promote digestive health. Additionally, bananas provide a natural sweetness and moisture to baked goods, making them an excellent choice for recipes like our Pumpkin Banana Snack Bars. The natural sugars in bananas help to reduce the need for added sweeteners, allowing you to enjoy a healthier treat without sacrificing flavor.
The Versatility of Pumpkin Puree
Pumpkin is not just for pies; it’s a nutritional powerhouse that deserves a place in your baked goods. Pumpkin puree is low in calories yet high in vitamins A, C, and E, along with antioxidants that help combat oxidative stress. Using canned pumpkin puree in baking is convenient and time-saving, as it’s readily available year-round. Not only does it add moisture and a subtle sweetness to recipes, but it also enhances the flavor profile of baked goods. For those who prefer fresh pumpkin, roasting and pureeing it can be a rewarding alternative, especially during the fall when pumpkins are in season.
The Goodness of Nut Butter
Nut butters, whether almond, peanut, or cashew, are a fantastic addition to healthy snack bars. They are rich in healthy fats, protein, and essential vitamins and minerals. Nut butters contribute creaminess and richness to the bars, making them more satisfying and indulgent without the need for excessive sugar or unhealthy fats. When choosing a nut butter, consider options that are minimally processed and free from added sugars or hydrogenated oils for the best health benefits.
Natural Sweeteners: Honey vs. Maple Syrup
When it comes to sweetening our Yummy Pumpkin Banana Snack Bars, natural sweeteners like honey and maple syrup are excellent choices. Honey is known for its antibacterial properties and can provide a quick source of energy, while maple syrup is rich in antioxidants and has a unique flavor profile that can enhance the overall taste of the bars. Both sweeteners offer a healthier alternative to refined sugars and can be easily adjusted in the recipe depending on your personal preference for sweetness.
Preparing the Yummy Pumpkin Banana Snack Bars
Setting the Stage: Prepping Your Kitchen
Before diving into the recipe, it’s essential to set up your kitchen for success. A well-organized workspace can make the cooking process smoother and more enjoyable. Begin by gathering all your ingredients and tools, which will include mixing bowls, measuring cups and spoons, a baking dish, and a spatula. Make sure your kitchen is clean and clutter-free to allow for easy movement while you bake. Preheating your oven to the appropriate temperature is also crucial to ensure that your bars bake evenly.
Step-by-Step Instructions
Now that your kitchen is prepped, let’s get into the nitty-gritty of making Yummy Pumpkin Banana Snack Bars. Here’s a detailed explanation of each step in the recipe:
1. Gather Your Ingredients: Ensure you have ripe bananas, canned pumpkin puree, nut butter, honey or maple syrup, oats, flour, baking powder, baking soda, and spices like cinnamon and nutmeg.
2. Mash the Bananas: In a mixing bowl, use a fork to mash the ripe bananas until they reach a smooth consistency. This will help incorporate the bananas into the mixture more easily.
3. Combine Wet Ingredients: In the same bowl, add the pumpkin puree, nut butter, and your choice of honey or maple syrup. Mix these ingredients thoroughly until they are well combined. The mixture should be creamy and smooth.
4. Mix Dry Ingredients: In a separate bowl, combine the oats, flour, baking powder, baking soda, and spices. Whisk them together to ensure that the baking powder and baking soda are evenly distributed throughout the dry mixture.
5. Combine Wet and Dry Mixtures: Gradually add the dry ingredients to the wet mixture, stirring gently until just combined. Be careful not to overmix, as this can lead to dense snack bars. The batter should be thick but moist, thanks to the bananas and pumpkin.
6. Prepare the Baking Dish: Lightly grease a baking dish or line it with parchment paper for easy removal. Spreading the batter evenly in the dish is crucial for even baking.
By following these initial steps, you’ll be well on your way to creating a delicious batch of Yummy Pumpkin Banana Snack Bars. As we progress through the recipe, you’ll discover how simple and rewarding it is to whip up these nutritious treats right in your kitchen. Stay tuned for more detailed instructions on the baking process and tips for customizing your bars to suit your taste preferences!
Visual Cues for Knowing When Each Stage is Complete
When it comes to baking, visual cues can make the difference between perfectly baked snack bars and an undercooked or overly dry disaster. Here’s what to look for at each stage of the baking process:
Baking Time and Temperature
Optimal Baking Conditions for Achieving Perfect Bars
To bake your Pumpkin Banana Snack Bars, preheat the oven to 350°F (175°C). This moderate temperature allows the bars to cook evenly while retaining their moisture. Place the baking pan in the center of the oven to ensure consistent heat distribution.
Signs That Indicate When the Bars Are Ready
– Edge Firmness: Look for the edges to start pulling away slightly from the sides of the pan. This is a good sign that the bars are setting.
– Surface Appearance: The top should appear golden brown and slightly puffed. You may also notice tiny cracks forming on the surface, indicating that the bars are baking properly.
– Toothpick Test: Insert a toothpick into the center of the bars. If it comes out clean or with a few moist crumbs (not wet batter), your bars are done. Remember that they will continue to firm up as they cool.
Customizing Your Snack Bars
Exploring Add-Ins for Extra Flavor
To elevate the taste of your Pumpkin Banana Snack Bars, consider adding a few flavorful components:
Ideas for Nuts and Seeds That Complement the Recipe
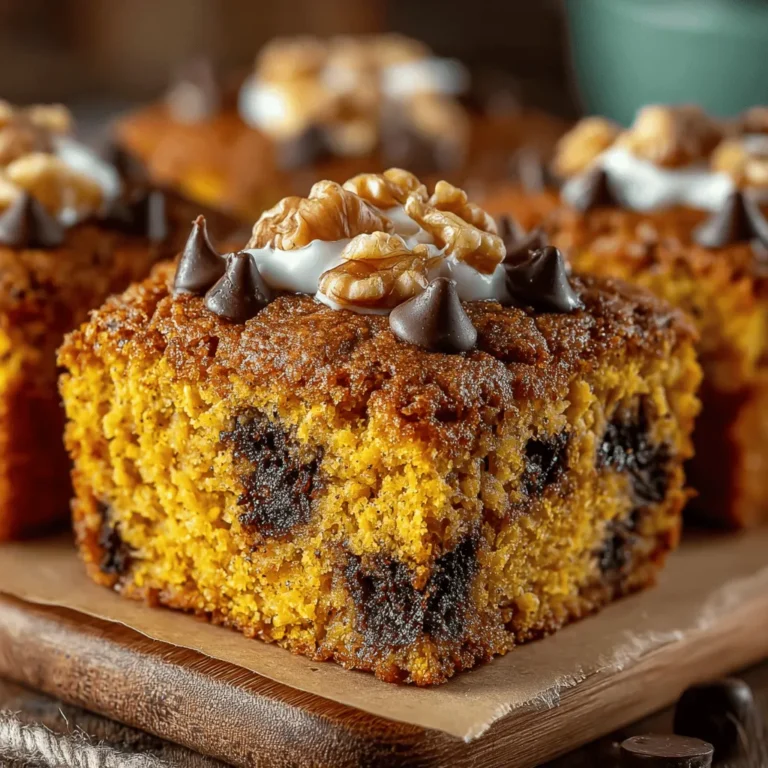
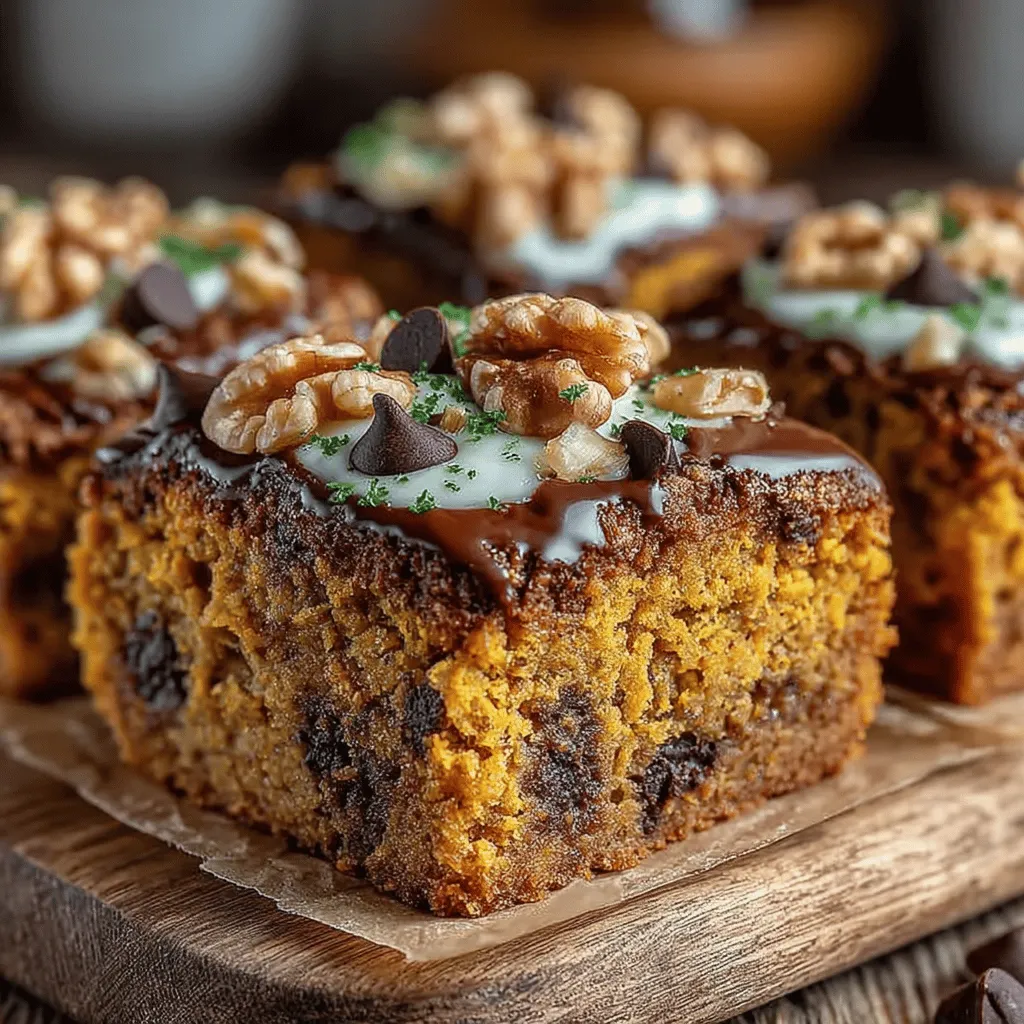
– Walnuts or Pecans: Chopped nuts like walnuts or pecans add a delightful crunch and nutty flavor. They also contribute healthy fats and protein.
– Pumpkin Seeds: Adding pumpkin seeds not only enhances the bar’s taste but also boosts its nutritional profile with essential minerals.
Benefits of Adding Dark Chocolate Chips
Incorporating dark chocolate chips introduces a rich, indulgent flavor and pairs beautifully with the sweetness of bananas and the spiciness of pumpkin. Dark chocolate is also rich in antioxidants, making it a guilt-free addition to your snack bars.
Suggestions for Dried Fruits or Spices to Enhance Taste
– Cranberries or Raisins: Dried fruits like cranberries or raisins can provide a chewy texture and a burst of sweetness, enhancing the overall flavor.
– Cinnamon and Nutmeg: For extra warmth and depth, consider adding an additional sprinkle of cinnamon or a pinch of nutmeg to complement the pumpkin flavor.
Making It Gluten-Free
If you need to make your Pumpkin Banana Snack Bars gluten-free, the good news is that it’s quite simple:
Options for Gluten-Free Oats and Other Substitutions
Opt for certified gluten-free oats instead of regular oats. This ensures that you’re not inadvertently consuming gluten, which can be present in non-certified oats due to cross-contamination.
How to Ensure the Recipe Remains Delicious Without Gluten
You can substitute all-purpose flour with almond flour or a gluten-free flour blend, which will keep the bars moist and tasty without compromising texture. Just be mindful of the moisture content, as gluten-free flours can sometimes absorb more liquid.
Vegan Variations
For those following a vegan lifestyle, adapting this recipe is straightforward:
Tips for Replacing Eggs and Honey in the Recipe
Instead of eggs, you can use flaxseed meal as a binder. Mix 1 tablespoon of flaxseed meal with 2.5 tablespoons of water, let it sit for about 5 minutes until it becomes gelatinous, and then add it to the mixture.
Honey can be replaced with maple syrup or agave nectar, both of which offer a similar level of sweetness without animal products.
Suggestions for Plant-Based Alternatives That Maintain Texture
Using unsweetened applesauce can not only replace eggs but also add moisture to your snack bars. Additionally, incorporating a bit of coconut oil can help achieve a rich texture that keeps the bars soft and chewy.
Storing and Serving Suggestions
Optimal Storage Practices
Best Ways to Store the Bars for Freshness
To keep your Pumpkin Banana Snack Bars fresh, allow them to cool completely before wrapping them tightly in plastic wrap or storing them in an airtight container. They can be kept at room temperature for up to three days.
How to Freeze for Longer-Term Storage
For longer storage, these bars freeze beautifully. Simply cut them into individual portions, wrap each piece in plastic wrap, and then place them in a freezer-safe bag or container. They can be stored in the freezer for up to three months. When you’re ready to enjoy them, simply thaw them in the fridge overnight or warm them in the microwave for a few seconds.
Creative Serving Ideas
Pairing Suggestions for Enjoying the Bars
These bars are delicious on their own, but for a more indulgent treat, try pairing them with a dollop of almond butter or a drizzle of peanut butter. A scoop of yogurt or a dollop of whipped cream can also turn them into a delightful dessert.
Using the Bars as a Base for Other Desserts or Snacks
You can get creative by crumbling the bars over a bowl of oatmeal for added texture and flavor or incorporating them into a parfait with layers of yogurt and fresh fruit. They also make a great base for a dessert trifle, adding nutritional value while satisfying your sweet tooth.
Conclusion
The Yummy Pumpkin Banana Snack Bars are a delightful treat that combines flavors and nutrition in a way that satisfies both the palate and the body. By using simple, wholesome ingredients and following the steps outlined in this article, you can create a snack that not only fuels your day but also brings joy to your taste buds. Whether enjoyed on their own or customized with your favorite add-ins, these bars are sure to become a staple in your kitchen.
Not only are these bars easy to make, but they also offer endless possibilities for personalization. Whether you prefer them vegan, gluten-free, or with added chocolatey goodness, these snack bars can adapt to your dietary needs and preferences. So, gather your ingredients, follow the instructions, and indulge in a batch of these delectable Pumpkin Banana Snack Bars – your taste buds will thank you!
