
Chocolate Heaven No-Bake Granola Bars: A Delicious and Nutritious Snack
In recent years, no-bake recipes have surged in popularity, and it’s not hard to see why. With busy lifestyles that often leave little time for elaborate cooking, quick and easy meal solutions are in high demand. No-bake recipes offer a perfect solution, allowing home cooks to whip up delicious treats without turning on the oven. Among the variety of no-bake options, Chocolate Heaven No-Bake Granola Bars stand out as a particularly enticing choice. These bars not only satisfy the sweet tooth but also provide a nutritious boost, making them an ideal snack for anyone on the go.
As we navigate through our hectic days, the importance of healthy snacking cannot be overstated. Traditional snack options are often laden with sugar and unhealthy fats, leaving us feeling sluggish and unsatisfied. In contrast, Chocolate Heaven No-Bake Granola Bars are crafted with wholesome ingredients designed to fuel your body and keep energy levels stable. With a rich chocolate flavor combined with the satisfying crunch of oats and nuts, these bars are perfect for busy professionals, parents, students, and anyone looking for a quick pick-me-up.
What makes this recipe even more appealing is its versatility. Chocolate Heaven No-Bake Granola Bars can easily be adapted to suit various dietary preferences. Whether you’re following a gluten-free diet, adhering to vegan principles, or simply looking for a healthier snack option, this recipe can be customized to meet your needs. With just a few simple ingredient swaps, anyone can enjoy these delicious bars without compromising on taste or health.
Understanding the Ingredients
Before diving into the step-by-step process of making Chocolate Heaven No-Bake Granola Bars, it’s essential to understand the role and benefits of each ingredient used in this delightful recipe.
1. Rolled Oats: At the heart of these granola bars are rolled oats, which provide not only a satisfying base but also numerous health benefits. Rich in dietary fiber, oats support heart health by helping to lower cholesterol levels. They are also a great source of complex carbohydrates, providing sustained energy throughout the day. This makes them an ideal choice for anyone looking to maintain stable blood sugar levels.
2. Almond Butter: This creamy nut butter adds a delicious nutty flavor and serves as a binding agent for the bars. Almond butter is packed with healthy fats, protein, and essential vitamins and minerals, including vitamin E and magnesium. For those with nut allergies, alternatives like sunflower seed butter or peanut butter can be used without sacrificing taste or texture.
3. Honey vs. Maple Syrup: Sweetness is an essential component of granola bars, and this recipe offers a choice between honey and maple syrup. Honey provides natural sweetness and contains antioxidants, but it may not be suitable for vegans. Maple syrup, on the other hand, is a vegan-friendly alternative with a unique flavor profile and lower glycemic index, making it a better option for those watching their sugar intake. Both sweeteners can enhance the overall flavor while providing natural energy.
4. Mini Chocolate Chips: To achieve that chocolate heaven experience, mini chocolate chips are a must. The choice between dark and semi-sweet chocolate can impact not only the flavor but also the health benefits. Dark chocolate is higher in antioxidants and lower in sugar compared to semi-sweet varieties, making it a healthier option for chocolate lovers.
5. Chia Seeds: While optional, chia seeds add a nutritional powerhouse to the bars. These tiny seeds are high in omega-3 fatty acids, fiber, and protein, contributing to overall heart health and digestive wellness. They also help to bind the mixture together when soaked in liquid, enhancing the texture of the bars.
6. Chopped Nuts: Adding a variety of chopped nuts not only provides a delightful crunch but also boosts the nutritional value. Nuts are an excellent source of healthy fats, protein, and essential nutrients. Almonds, walnuts, and pecans are popular choices, each offering unique health benefits. For a nut-free option, seeds like pumpkin or sunflower can be used instead.
7. Vanilla Extract and Sea Salt: Finally, a splash of vanilla extract elevates the flavor profile of the bars, adding warmth and depth. A pinch of sea salt enhances sweetness and balances the overall taste, making every bite truly satisfying.
Step-by-Step Guide to Making Chocolate Heaven No-Bake Granola Bars
Now that we understand the benefits and roles of the ingredients, it’s time to jump into the preparation of Chocolate Heaven No-Bake Granola Bars. The first step in creating these delicious snacks involves preparing your baking pan, which is crucial for ensuring easy removal once the bars have set.
1. Preparation of the Baking Pan: Begin by lining an 8×8 inch baking pan with parchment paper. This step is essential as it prevents the granola bars from sticking to the pan, allowing for easy removal. Make sure to leave some overhang on the sides of the parchment paper, which will aid in lifting the bars out of the pan once they are set.
2. Combining Dry Ingredients: In a large mixing bowl, start by adding rolled oats, chopped nuts, and chia seeds. Stir these dry ingredients together to ensure an even mix. This step is vital for achieving the right texture and flavor throughout the bars. If you’re using chocolate chips, you can also fold them in at this stage to distribute them evenly.
3. Mixing Wet Ingredients: In a separate bowl, combine your chosen sweetener (honey or maple syrup) with almond butter and vanilla extract. For the best results, slightly warm the almond butter in the microwave for a few seconds to make it easier to mix. Whisk the ingredients together until they form a smooth, cohesive mixture. The consistency should be thick but pourable, allowing it to coat the dry ingredients adequately.
4. Combining Mixtures: Pour the wet mixture over the dry ingredients and use a spatula to combine them thoroughly. It’s important to ensure that every oat is coated with the wet mixture to achieve the desired texture and flavor in the final product. Mix until all the ingredients are well integrated, and the mixture holds together when pressed.
These initial steps set the foundation for your Chocolate Heaven No-Bake Granola Bars, paving the way for a delicious snack that not only satisfies your cravings but also aligns with your health goals. Stay tuned for the next part of this article, where we will delve into the final steps of assembly, setting, and tips for storage to ensure your granola bars remain fresh and delightful.
Incorporating Chocolate Chips: Ensuring Even Distribution Without Melting
The key to achieving the perfect Chocolate Heaven No-Bake Granola Bars lies in the distribution of chocolate chips throughout the mixture. To ensure that your chocolate chips are evenly distributed without melting, it’s best to add them after you’ve combined the wet and dry ingredients. Here’s how to do it:
1. Let the Mixture Cool: After mixing your oats, nuts, and other dry ingredients with the melted nut butter and sweetener, allow the mixture to cool slightly. This helps prevent the chocolate chips from melting into a gooey mess.
2. Gently Fold in the Chocolate Chips: Once the mixture is cool but still pliable, gently fold in the chocolate chips using a spatula or wooden spoon. This method ensures that the chocolate chips remain intact and provide little bursts of chocolatey flavor in every bite.
3. Avoid Overmixing: Be careful not to overmix at this stage. You want the chocolate chips to be evenly distributed without breaking them up. The goal is to maintain their shape and create delightful pockets of chocolate throughout your bars.
Transferring to the Pan: Best Practices for Compacting the Mixture
Once your mixture is ready, it’s time to transfer it to the pan. Proper transfer and compacting are essential for achieving that perfect bar shape and texture.
1. Choose the Right Pan: A square or rectangular baking dish lined with parchment paper works best. The parchment paper will prevent the bars from sticking and makes it easier to lift them out later.
2. Scoop and Spread Evenly: Use a spatula to scoop the mixture into the prepared pan. Spread it evenly across the bottom. This step is crucial for ensuring uniform thickness, which leads to even cooking and better texture.
3. Compact the Mixture: Using the back of a measuring cup or your hands (make sure they are clean!), press down firmly on the mixture to compact it. This step is vital; the more compact your mixture is, the denser and chewier your bars will be.
4. Smooth the Top: After compacting, smooth the top with the spatula for a neat appearance.
Chilling the Mixture: Importance of Setting Time for Bar Integrity
Chilling the mixture is an essential step that allows the bars to set properly. Here’s why it matters:
1. Setting the Structure: Refrigeration helps the nut butter and sweeteners solidify, which binds the ingredients together. This step is crucial for maintaining the structure of the bars when you slice them.
2. Recommended Chilling Time: Allow the mixture to chill in the refrigerator for at least two hours. If you can leave it overnight, that’s even better. The longer the bars sit, the better they will hold together.
3. Avoid the Freezer for Quick Setting: While it may be tempting to quick-set the bars in the freezer, this can lead to a texture that is too hard. Stick with the refrigerator for the best outcome.
Slicing and Serving: Presentation Tips for an Appealing Finish
Once your bars have set, it’s time for the fun part: slicing and serving!
1. Remove from the Pan: Use the parchment paper to lift the bars out of the pan. Place them on a cutting board for slicing.
2. Use a Sharp Knife: A sharp knife works best for cutting through the bars without crumbling them. For cleaner cuts, you can warm the knife slightly under hot water (just be careful not to burn yourself).
3. Cut Into Even Portions: Consider cutting the bars into equal-sized pieces, typically 1-inch by 3-inch rectangles. This size is perfect for on-the-go snacks.
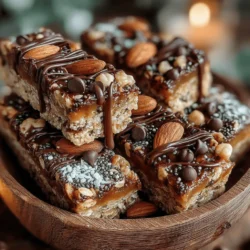
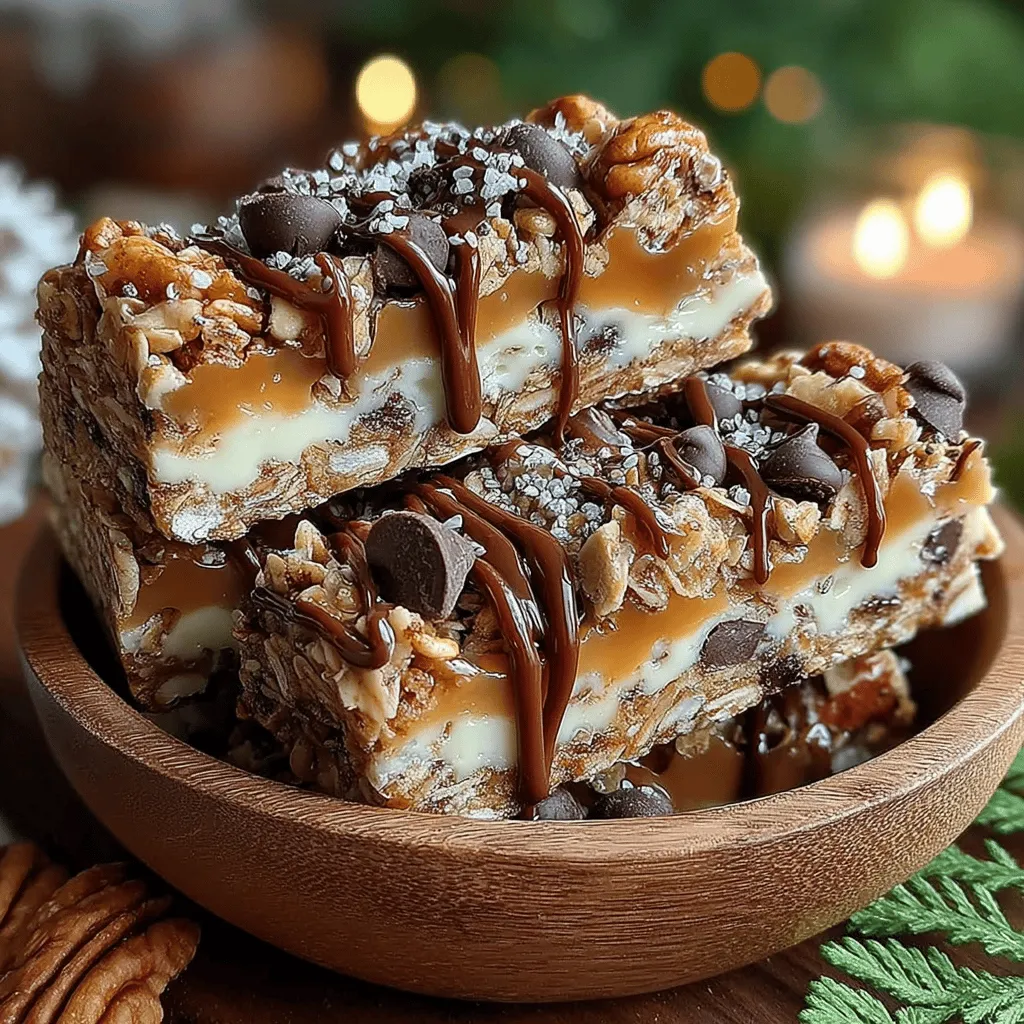
4. Presentation Ideas: To make your bars visually appealing, you can drizzle a bit of melted chocolate over the top or sprinkle some extra nuts or seeds. A simple dusting of cocoa powder can also enhance the presentation.
Nutritional Benefits of Chocolate Heaven No-Bake Granola Bars
These homemade granola bars not only satisfy your sweet tooth but also pack a nutritional punch. Here’s a breakdown of their benefits:
Caloric Breakdown Per Serving and Macro-Nutrient Analysis
Each bar typically contains around 150-200 calories, depending on the size and ingredients used. The macro-nutrient composition generally includes:
– Carbohydrates: Primarily from oats and any added dried fruits.
– Protein: Sourced from nuts and seeds, contributing to muscle repair and growth.
– Fats: Healthy fats from nut butter and seeds, which promote heart health.
Health Benefits of Incorporating Oats, Nuts, and Seeds into the Diet
Oats are a great source of dietary fiber, which aids digestion and helps maintain healthy cholesterol levels. Nuts and seeds provide essential fatty acids, protein, and various vitamins and minerals, contributing to overall well-being.
The Role of Healthy Fats in Energy and Satiety
The healthy fats in nut butter and seeds keep you feeling full longer, making them an excellent option for snacks. They provide sustained energy without the crash associated with sugary snacks.
Comparison with Store-Bought Granola Bars: Why Homemade is Better
Homemade granola bars allow you to control the ingredients and avoid added sugars, preservatives, and artificial flavors commonly found in store-bought varieties. You can customize them to suit your taste and dietary needs, making them a healthier option overall.
Customization and Variations
One of the best aspects of the Chocolate Heaven No-Bake Granola Bars is their versatility. Here are some ideas for customization:
Suggestions for Ingredient Substitutions Based on Dietary Needs
– Nut-Free: Replace nut butter with sunflower seed butter or pumpkin seed butter for a nut-free alternative.
– Sugar-Free: Use ripe bananas or applesauce as a natural sweetener instead of syrup or honey.
Flavor Variations: Adding Spices or Dried Fruits
– Spices: Experiment with spices like cinnamon, nutmeg, or ginger to add depth to your bars. A pinch of sea salt can also enhance the sweetness.
– Dried Fruits: Incorporate dried fruits like cranberries, raisins, or apricots for additional flavor and texture.
Creative Ways to Serve: Pairing Options with Yogurt, Smoothies, or as a Topping
These bars can be enjoyed in various ways. Pair them with yogurt for a satisfying breakfast or snack, crumble them over smoothies for added crunch, or use them as a topping for oatmeal or chia pudding.
Storage and Shelf Life
Proper storage can significantly extend the life of your Chocolate Heaven No-Bake Granola Bars.
Best Practices for Storing No-Bake Granola Bars
Store the bars in an airtight container at room temperature for up to a week. If you live in a particularly warm climate, consider refrigerating them to maintain their firmness.
Discussion on Freezing Options to Extend Shelf Life
For longer storage, you can freeze the bars. Wrap each bar individually in plastic wrap and store them in a freezer-safe container or bag. They can last up to three months in the freezer.
Signs to Look for to Determine if the Bars are Still Good to Eat
Check for any off smells, discoloration, or mold. If any of these signs are present, it’s best to discard the bars. When stored properly, they should remain fresh and tasty.
Conclusion
Making your own Chocolate Heaven No-Bake Granola Bars is not only simple but also offers countless benefits. These bars are a delicious, healthy snack option that can easily fit into your daily routine. With their customizable nature, you can experiment with different ingredients to suit your taste and dietary preferences.
I encourage you to try your hand at this recipe and make it a staple in your kitchen. Not only will you have a delicious snack on hand, but you’ll also be taking a step towards healthier eating habits. Integrating homemade snacks into your life can lead to better nutritional choices and overall wellness. So, roll up your sleeves, gather your ingredients, and enjoy the delightful journey of making your very own Chocolate Heaven No-Bake Granola Bars!