Mini Grilled Cheese Pizza Melts Recipe
In the world of comfort food, few dishes evoke as much nostalgia and satisfaction as grilled cheese and pizza. Both staples of casual dining, they conjure memories of cozy family dinners and late-night snacks. The Mini Grilled Cheese Pizza Melts bring together the best of both worlds in a fun and delicious twist. Imagine the gooey, melty goodness of cheese encased in crispy, buttery bread, with the savory flavors of pizza toppings—this dish is sure to delight anyone who takes a bite.
Combining these two beloved dishes not only creates a mouthwatering result but also enhances the experience of eating. The Mini Grilled Cheese Pizza Melts are incredibly easy to make, offering a simple yet satisfying way to elevate your meal or snack time. They can be enjoyed as a quick lunch, a fun appetizer, or the star of the show at your next gathering. The combination of flavors and textures is a hit with both kids and adults, making them an excellent choice for mixed-age events like family parties, game nights, or even casual get-togethers with friends.
One of the most appealing aspects of these melts is their versatility. While the basic recipe is already a crowd-pleaser, the opportunity for customization allows you to tailor each melt to your personal taste preferences. From selecting different cheeses to adding a variety of toppings, such as pepperoni, vegetables, or even pesto, the possibilities are endless. This makes Mini Grilled Cheese Pizza Melts not only a delicious choice but also a creative one, inviting you to experiment and create your perfect version.
The Allure of Mini Grilled Cheese Pizza Melts
The charm of Mini Grilled Cheese Pizza Melts lies in their ability to cater to a wide range of occasions. Whether you are hosting a family dinner, throwing a party, or simply enjoying a cozy night in, these melts are the perfect addition to your menu. Their bite-sized nature makes them easy to serve and share, while their irresistible flavors ensure that they will be a hit among guests.
For families, these melts are an excellent option for getting kids involved in the kitchen. Children love to help assemble their own melts, choosing their favorite toppings while learning basic cooking skills. This not only fosters a sense of ownership over their food but also makes mealtime more engaging and fun. For adults, the appeal is equally strong—these melts can be paired with a variety of side dishes or served as part of a larger spread, making them a versatile option for any gathering.
As a quick snack or a fulfilling meal, Mini Grilled Cheese Pizza Melts can satisfy cravings at any time of day. Their simplicity allows for easy preparation, ensuring that they can be whipped up in a matter of minutes. Whether enjoyed on their own or alongside a salad or soup, these melts offer a delightful culinary experience that is both comforting and satisfying.
Ingredients Overview
To create delicious Mini Grilled Cheese Pizza Melts, you’ll need a few key ingredients that work harmoniously together to deliver unbeatable flavor and texture. Here’s a breakdown of the essentials:
1. Bread: The foundation of any grilled cheese melt, the bread plays a crucial role in the overall experience. You can use classic white bread, whole grain, or even sourdough for a more artisanal touch. The choice of bread will influence the melt’s flavor and texture, so pick one that you love.
2. Cheese: This is, arguably, the star ingredient. A combination of cheeses works best, as it creates a rich and complex flavor. Cheddar and mozzarella are popular choices; cheddar adds sharpness while mozzarella provides that irresistible stretch. Feel free to experiment with other cheeses like provolone, gouda, or pepper jack for an extra kick.
3. Toppings: This is where the pizza aspect shines through. Traditional toppings like pepperoni or sausage can be added, but don’t shy away from vegetables like bell peppers, mushrooms, or olives. Even fresh basil or a drizzle of pesto can elevate your melts to gourmet status.
4. Seasonings: A sprinkle of Italian herbs, garlic powder, or even crushed red pepper flakes can enhance the flavor profile. These small additions can make a big difference in creating a well-rounded taste.
5. Butter: For grilling, a mixture of butter and olive oil is ideal. This not only adds richness but also helps achieve that golden-brown, crispy exterior that makes grilled cheese so satisfying.
With these ingredients in hand, you’re well on your way to creating Mini Grilled Cheese Pizza Melts that are mouthwateringly good. However, the magic lies in the preparation and assembly, which brings us to the next crucial step.
Preparation Steps
Creating Mini Grilled Cheese Pizza Melts is a straightforward process that can be broken down into a few simple steps. Here’s how to get started:
1. Preheat Your Pan: Begin by preheating a skillet or griddle over medium heat. This ensures that your melts will cook evenly and achieve that coveted crispy exterior.
2. Prepare the Bread: Take your chosen bread and cut it into small squares or rectangles. Depending on the size of your melts, aim for pieces that are about 2-3 inches in diameter. This size is manageable for snacking and perfect for a party platter.
3. Create the Cheese Mixture: In a mixing bowl, combine your selected cheeses. If you’re using multiple types, be sure to grate them for even melting and distribution. You can also toss in some dried Italian herbs for added flavor at this stage.
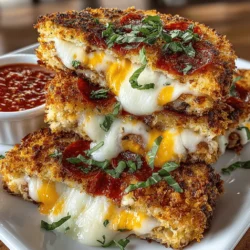
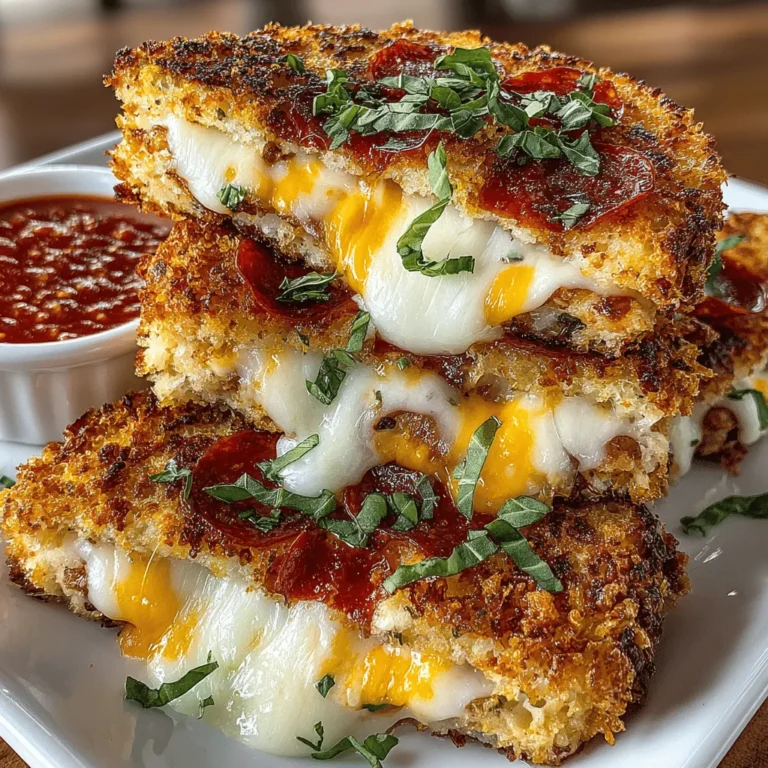
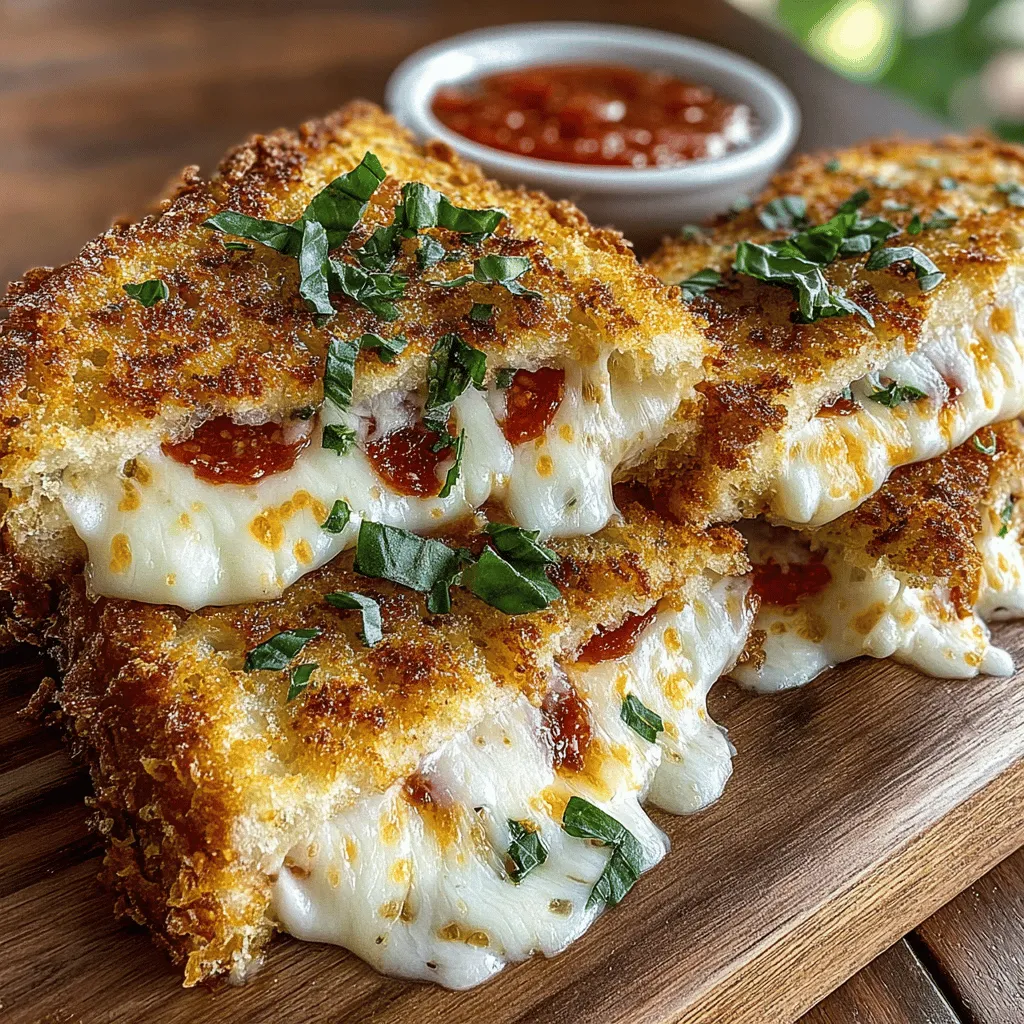
4. Assemble the Melts: On one slice of bread, spread a generous amount of the cheese mixture. Add your desired toppings—be it pepperoni, vegetables, or a drizzle of marinara sauce—then top it with another slice of bread to create a sandwich. Repeat this process for the remaining bread and cheese.
5. Butter and Grill: In a small bowl, mix softened butter with a splash of olive oil. This mixture will help achieve that perfect golden crust. Lightly brush the outsides of each sandwich with the butter mixture before placing them in the hot skillet. Cook for about 3-4 minutes on each side, or until the bread is crispy and the cheese is melted.
6. Serve and Enjoy: Once cooked, remove the melts from the skillet and let them cool slightly before serving. You can cut them into smaller pieces for easy sharing, and serve with marinara sauce on the side for dipping.
By following these steps, you’ll create Mini Grilled Cheese Pizza Melts that are not only delicious but also visually appealing. In the next section, we’ll dive into the grilling techniques that will ensure your melts are perfectly cooked every time.
Grilling the perfect Mini Grilled Cheese Pizza Melts requires attention to detail. Achieving that golden-brown crust while ensuring the cheese inside melts to perfection is both an art and a science. Here’s how to master the grilling process and make these delectable melts even more enjoyable.
Perfecting the Grilling Technique
Temperature Control
The first step in ensuring your Mini Grilled Cheese Pizza Melts turn out beautifully is managing the temperature of your skillet. A medium to medium-low heat setting is ideal for grilling these sandwiches. This allows the bread to toast evenly while giving the cheese enough time to melt without burning the exterior.
If your skillet is too hot, the bread may brown too quickly, leading to a burnt exterior while the cheese remains solid. Conversely, if the temperature is too low, the bread may take longer to cook, resulting in a chewy texture rather than the desired crispiness. A good rule of thumb is to preheat your skillet for a few minutes before adding the sandwiches, then adjust the heat as needed during the cooking process to maintain a consistent temperature.
Flipping for Even Cooking
Flipping the sandwiches is crucial for achieving even cooking. Use a spatula to gently lift the sandwich from one side and flip it over in a swift, confident motion. This not only prevents the filling from spilling out but also ensures that both sides of the bread receive the same amount of heat.
For best results, flip the sandwiches only once during cooking. This allows each side to develop a crispy texture and prevents disrupting the melted cheese. If you’re unsure about the doneness, peek under one side to check for that beautiful golden-brown color before making the flip.
Covering the Skillet
An effective technique to expedite cheese melting is to cover the skillet with a lid after flipping the sandwiches. This traps heat and moisture inside, creating an oven-like environment that encourages the cheese to melt thoroughly. Just remember to keep an eye on the bread to avoid over-browning.
Using a lid is especially useful when you’re preparing multiple sandwiches at once. It ensures that the cheese in each melt is perfectly gooey while giving you time to prepare sides or dips.
Serving Suggestions
When it comes to serving your Mini Grilled Cheese Pizza Melts, presentation can elevate the dining experience. Here are some creative ideas to enhance your serving style:
Presentation Tips
1. Plating: Arrange the melts on a vibrant cutting board or a colorful plate. Cutting them diagonally into triangles adds an appealing touch.
2. Garnishing: Fresh herbs, such as basil or parsley, can provide a pop of color and flavor. Consider a sprinkle of Italian seasoning or chili flakes for added flavor and visual appeal.
3. Dipping Bowls: Serve with small bowls of extra pizza sauce or marinara for dipping. This not only complements the flavor but also adds an interactive element to the meal.
Complementary Sides and Dips
Mini Grilled Cheese Pizza Melts pair wonderfully with a variety of sides. Consider serving them with:
– Side Salad: A fresh garden salad with a light vinaigrette can balance the richness of the melts.
– Vegetable Sticks: Carrot and cucumber sticks with hummus or ranch dressing offer a crunchy contrast.
– Soups: Tomato soup is a classic pairing that enhances the comforting nature of the melts.
Beverage Pairing
To complete the meal, think about the perfect beverage. A chilled soda or sparkling water with lemon complements the richness of the melts. For an adult-friendly option, a light red wine or a refreshing beer can enhance the flavor profile, making it a delightful dining experience.
Variations and Customizations
One of the best aspects of Mini Grilled Cheese Pizza Melts is their versatility. You can easily customize them to suit various tastes and dietary preferences.
Exploring Variations
1. Vegetarian Options: Incorporate vegetables like spinach, mushrooms, or bell peppers for a hearty vegetarian twist. You can also use pesto instead of pizza sauce for an herbaceous flavor.
2. Spicy Versions: Add jalapeños or crushed red pepper flakes to the cheese filling to give your melts a kick. Alternatively, consider using pepper jack cheese for an extra layer of heat.
3. Alternative Bread Choices: Experiment with different types of bread. Whole grain, sourdough, or even gluten-free bread can provide unique flavors and textures.
Personalizing with Toppings
Encourage creativity by allowing readers to experiment with their favorite pizza toppings. Here are some ideas:
– Meats: Pepperoni, cooked sausage, or bacon bits can add savory depth.
– Cheese Blends: Mix mozzarella with provolone, cheddar, or even blue cheese for a gourmet touch.
– Herbs and Spices: Fresh basil, oregano, or garlic powder can enhance the flavor profile and transform the classic into something extraordinary.
Dietary Accommodations
For those with dietary restrictions, simple ingredient swaps can make this recipe accessible to everyone. Nutritional yeast can replace cheese for a vegan option, while gluten-free bread can accommodate those with gluten sensitivities. Always check labels to ensure that all ingredients align with dietary needs.
Nutritional Information
As you savor your Mini Grilled Cheese Pizza Melts, it’s essential to consider their nutritional profile. Here’s a brief overview:
– Cheese: Provides protein and calcium, but it can be high in fat. Opting for lower-fat cheese options can help balance indulgence with health.
– Bread: Offers carbohydrates for energy. Whole grain options can provide additional fiber.
– Toppings: Vegetables increase the nutrient density of the dish, adding vitamins and minerals.
When enjoying these melts, portion control is key. These delightful sandwiches can fit into a balanced diet when consumed as part of a meal that includes a variety of food groups.
Conclusion
Mini Grilled Cheese Pizza Melts are more than just a meal; they represent the joy of cooking and the comfort of home-cooked food. Whether you’re making them for a family gathering, a party, or a cozy night in, this recipe is sure to delight and satisfy.
Encourage creativity by trying out different toppings and styles, making each batch uniquely yours. The fusion of flavors—from the crispy bread to the gooey, melty cheese and savory toppings—creates a satisfying experience that is hard to resist.
So, roll up your sleeves, gather your ingredients, and dive into the delightful world of Mini Grilled Cheese Pizza Melts. Your taste buds will thank you for the adventure!